 “So you want to be a Gallantry (Handy) Man, huh? Well, good news. You’re in the right place, my man.”
- Cliff Booth (Brad Pitt), maybe, Once Upon A Time in Hollywood
With great power comes responsibility. That’s why a big part of being a classic Gallantry Man (or, rather, for this week’s Dispatch, Gallantry Handy Man) is having the ability to be handy and competent around the house (or condo, apartment, this, that, and the other place, you get the drift), to have the handyman skills that are needed in order to take care of the various small repairs and issues that inevitably come up from time to time. Let’s face it, something or another around where you put your head down at night is always going to need a fixin’.
 “Let’s put these acquired handy man skills to work, brother! Let’s go!”
Look it. We’re not saying there aren’t those times when calling a general contractor, plumber, carpenter, etc. for home maintenance – heavy duty electrical jobs, plumbing, anything involving your septic tank, you name it - is entirely appropriate. Not by a long shot. However, we are saying that you can flex your Gallantry Handyman credentials while saving some serious cash if you just have a introductory tactile skill set, one that allows you to simply take care of the handy basics.
 “Cold beer? Check.”
With time and a solid knowledge of how to use the EDC in our Gallantry Handyman toolbox (i.e. the items that we’ll be highlighting this week), we guarantee your confidence when it comes to your own handyman skills will accrue. Practice makes perfect, you know what we mean?
 “Cool shades? Check. Alright, let’s frickin’ do this.”
The bottom line? Having a base knowledge of carpentry is important for any man, Gallantry or not. So roll those sleeves up, hoss, because we’re getting into some essential skills that every Gallantry Handy Man should have up his sleeve, skills that will help any Gallantry Handy Man feel good (scratch that, great) about being the king of his castle, a true master of his domain. Heck, after this read you may even actually begin to look forward to those moments where you get to utilize your DIY skills in order to get your home back into tip-top shape. We mean it!
 “Listen, dude. If you want to be a Gallantry Handy Man, you’re really going to have to have at least a base knowledge of carpentry.”
LET’S GO!
First up, you’ve got to know how to…
 “Fix her!”
CHANGE A TIRE
Okay, yes, so this first skill may not technically involve your actual, physical home, but being able to change a tire on your second home, your ride, when you’ve got a flat? Yeah, it’s no laughing matter.
 “Can I at least get a ride to fix my face first?”
Cliff Booth broke a Spahn Ranch hippie’s nose to make that point in Once Upon A Time In Hollywood.
 “Nope. Tire first.” - Cliff Booth
Meanwhile, in this here movie, Once Upon A Time in Gallantry, we’re going to get into how to actually do it by your lonesome. In our humble opinion, being able to change a tire is a necessity for any driver. Relying solely on being able to call roadside assistance when you’re stuck is not a Gallantry Handyman move, since it indicates that you’re actually not fully prepared for whatever comes your way. After all, what if there’s no cell service or your phone is dead?
Exactly.
Should you need to change one of your tires, you’re going to want to have a jack, a lug wrench, a fully inflated spare tire, a vehicle owner’s manual, a mat (for kneeling), a rain poncho, a small cut of 2"x6” wood (to secure the jack), gloves, a couple wheel wedges, a tire gauge, and a flashlight (with working batteries, of course) in your glovebox and trunk. As for that last must-have item, we’ve got just the everyday carry flashlight for the job. We’ve got…
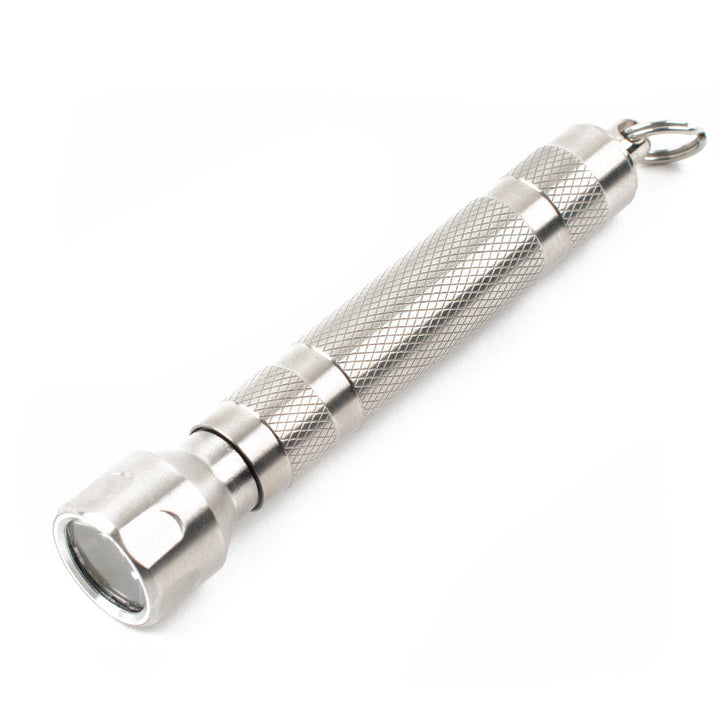
THE EIGER ULTRA X FLASHLIGHT FROM PEAK LED SOLUTIONS

Designed with professional applications in mind, Peak LED's Eiger Ultra X everyday carry flashlight is one of the most powerful single battery-powered portable torches available. In fact, this upgraded version is a whopping 50% brighter than even the standard Eiger, which not only makes it excellent for illuminating even the darkest paths, but also allows it to double as a self-defense device that temporarily blinds assailants. It also boasts a nearly indestructible scratch-resistant polycarbonate window protecting its Cree XPG LED emitter, features a simple twist operation, and comes with a handy keychain tail attachment for easy carry. And, like all of Peak LED's products, this one was designed and manufactured right here in the USA.
SPECIFICATIONS
- Cree XPG LED emitter
- Stainless steel construction
- Unbreakable scratch-resistant polycarbonate window
- Electronics potted in Thermal Epoxy for added shock- and water-resistance
- Works exclusively with 10440 Lithium Ion rechargeable battery (not included)
- Simple twist operation
- Keychain attachment
- O-rings on all openings for water resistance
- Designed and manufactured in the USA
- 50% brighter than standard Eiger
- Unequaled output to battery life ratio
Eiger Ultra X Flashlight
$75.00
[tab-section data-sc-active-background="#ffffff" data-sc-other-background="#ffffff" data-sc-color="#555555"][tab title="Details"] Designed with professional applications in mind, Peak LED's Eiger Ultra X everyday carry flashlight is one of the most powerful single battery-powered portable torchs available. In fact, this upgraded version is a whopping 50% brighter… read more
Once you’ve double-checked that you’ve got your Eiger Ultra X flashlight and the rest (many of the aforementioned items should have come with your vehicle, so don’t you dare get rid of them), you’re ready steady to make a go at changing a tire. No matter what kind of car you’ve got, here’s how it’s done…
1. FIND A SAFE, LEGIT SPOT AND PULLOVER
Ideally, you’re going to want to pull over somewhere (as far as you possibly can if you’re on the side of the road) where the ground is level and solid so that your car doesn’t go rolling off. If you can, make it a point to avoid stopping near any bends in the road, as visibility is low around these parts.
If you can, try to avoid dark and/or unsafe areas. However, if you have no choice, remember that you’re carrying a fresh EDC flashlight that doubles as a self-defense device on your person.
2. USE YOUR HAZARD LIGHTS AND PARKING BRAKE
Doing this will help keep you and your vehicle safe by not only increasing your visibility, but also by decreasing your car’s capacity to roll off.
3. BRING OUT THE TOOLS
At the very least, you’ll need a jack, a wrench, a spare tire, and a flashlight. Having the other aforementioned items at your beck and call is ideal, but things happen. We get it.
4. LOOSEN THOSE LUG NUTS
If your vehicle just so happens to have a hubcap, pry that sucker off first. When you’re done, secure your wrench onto a lug nut and turn that bad boy counterclockwise until it’s loosey goosey. Repeat the process with the rest of your lug nuts.
5. LIFT YOUR CAR UP OFF THE GROUND
Check your owner’s manual to find out the right jack placement. In all likelihood, your owner’s manual will recommend that you place your jack under the metal portion of your car’s frame while going out of your way to make sure that it doesn’t come into contact with any plastic molding. Once your jack is properly placed, raise the tire that you are changing off of the ground while making sure that your jack stays perpendicular to the ground.
Also, give yourself a nice pat on the back. You’re halfway through the process, brother.
6. REMOVE THE LUG NUTS AND THE TIRE
Remove those loose lug nuts and keep them together in a safe location nearby (you’ll need them again shortly in order to secure your replacement tire). At this particular juncture, you’ll likely realize that there is literally nothing keeping your flat tire attached to your car, so securely grip it and pull it directly towards your body.
7. PLACE YOUR SPARE TIRE ON TOP OF YOUR CAR
Line up the holes in your spare tire with the lug nut posts and then place the spare on the wheelbase. Once your spare is on top of the wheelbase, push it as far onto the wheelbase as is humanely possible.
8. LUG NUT REPLACEMENT TIME
Put those lug nuts on so your spare tire stays put, but don’t get excited and tighten them all the way just yet (as it’s very important to tighten your lug nuts so that your tire is kept even).
9. LOWER YOUR VEHICLE AND BEGIN “THE TIGHTENING”
Slowly lower your vehicle with your jack until your spare tire just starts to touch the ground. Doing this will hold your tire in place as you start to tighten those lug nuts. Then, in increments, tighten the lug nuts, alternating every other nut (if you assign a number to each lug nut, that means you’ll be tightening in the following order: 1, 3, 5, 2, 4, 1, 3, 5, 2, 4…and repeat). Doing this is how you’ll be able to successfully keep your tire on straight.
10. COMPLETELY LOWER YOUR CAR AND FINISH “THE TIGHTENING”
When your lug nuts all feel equally tight, you can finally lower your car completely to the ground. Once your car has been grounded, check those lug nuts again, as they may be able to be tightened even a bit more. In this case, continue “The Tightening” in the same incremental order as step #9 until those gosh darn lug nuts can budge no more.
 “Man, I love the Silver Peak LED Eiger Ultra X EDC flashlight that I picked up from Gallantry.”
Once you’ve successfully changed your flat tire, toss that old, flat one of yours into your trunk and gather up all the tools that you used along the way. Then, proceed to drive off with a s***-eating grin on your face because you just successfully changed tire like a Gallantry Handyman boss!
YEAH, BUDDY!
 “Then I said, ‘Duh! I’m a Gallantry Handyman! Of course I know how to paint a wall!’”
PAINT A WALL
Painting a wall, especially in a neat and clean fashion, is actually not as simple as just slapping a paint-covered brush against the wall in question. Not by a country mile. To effectively and efficiently paint a wall, you need to be prepared. As you already well know, being prepared takes care of the heavy lifting, so by the time you get to the actual job, most of the tough stuff has already been taken care of.
When it comes to painting a wall, being prepared means knowing how to properly tape off corners and borders (so that you don’t wind up with weird, stray paint spots on other nearby surfaces, not to mention a bunch of sloppy lines), how to apply consistent strokes in order to get the right, intended texture, knowing when (and when not to) use a primer, and, of course, knowing the kinds of tape that will work best for masking (i.e. those that will not leave you with a big mess to deal with).
Also, if you intend to paint all the walls of a room, go ahead and add the length of all the room’s walls together and multiply that number by the height of the room (from the floor to the ceiling) in order to get the room’s square footage. Doing this will help you determine how much paint you need. For this potential step (as well any other step that involves any sort of measuring), you’re going to want the following awesome everyday carry tape measure from Gallantry. You’re going to want…
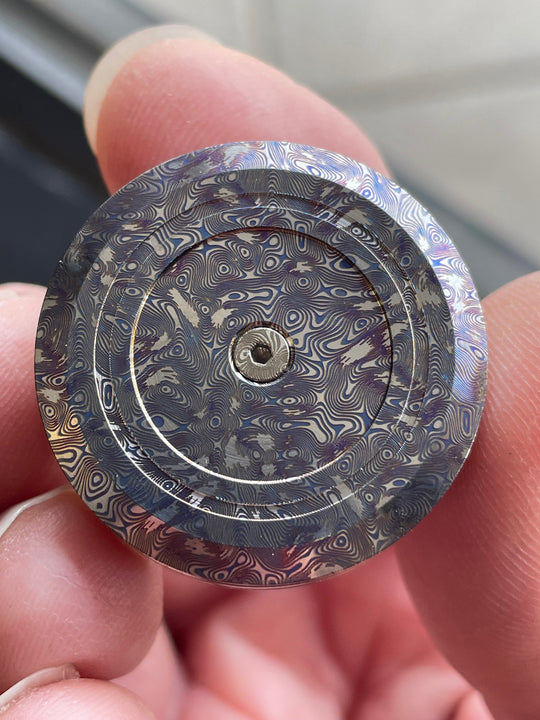
THE TI-TAPE TITANIUM TAPE MEASURE W/ DAMASCUS FINISH FROM TEC ACCESSORIES

The Ti-Tape is simply the smallest titanium tape measure in the world. Slightly larger than a US Quarter, it is the perfect tape measure for everyday carry. Why? Because it is super TINY, ultra-durable, and extremely lightweight. It also includes a removable keychain clip, so you can attach it anywhere to keep it with you at all times. As if all of that wasn't enough, the user-replaceable 3' measuring tape ensures you will never have to buy another portable tape measure again. Ever.
This exclusive edition (i.e. only for Gallantry) also has a laser-engraved Damascus-style finish that will undoubtedly catch the wandering eye of anyone nearby.
SPECIFICATIONS
- Manufactured from grade 5 titanium to last a lifetime
- Laser engraved Damascus-style finish
- Corrosion resistant and hypoallergenic
- 3 foot measuring length
- High contrast black on white markings, both imperial and metric units
- Removable stainless steel keychain attachment clip
- Replaceable measuring tape
- Ultra compact size
- Made in USA
Ti-Tape Titanium Tape Measure - Damascus Finish
$72.95
[tab-section data-sc-active-background="#ffffff" data-sc-other-background="#ffffff" data-sc-color="#555555"][tab title="Details"] The Ti-Tape is simply the smallest titanium tape measure in the world. Slightly larger than a US Quarter, it is the perfect tape measure for everyday carry. Why? Because it is super TINY, ultra-durable, and… read more
BOOM!
Okay, now that the tape measure bit has been covered, here’s how we recommend that you git ‘er done when it comes to painting a wall…
1. REPAIR ANY HOLES/SCUFFS IN THE WALL
Stand back and take a good ol’ gander at the wall you intend to paint. Do you see any small holes, gouges, cracks, or other slight defects in your wood, plaster, and drywall? If so, have no fear. Just lather some spackling paste onto these rough spots and you’ll be good to go. Minor fix-ups are nothing to fear, friend.
2. PREP THE ROOM
Take it easy, Dexter. We’re still just talking about a paint job here. In other words, you only need to cover the floor near the wall you’re looking to paint (as well as any nearby furniture) with a plastic sheet or canvas. Be sure to remove any fixtures (light switch plates, electrical outlet covers, curtain rods, door hinges, etc.) and tape down any and all of those edges, too.
3. SAND THE WALL
With a pole-sander and 120-grit sandpaper, sand that wall. Doing so will help the wall take that paint of yours in a more even fashion.
4. VACUUM TIME
Vacuum the remaining sanding dust off the wall. You know what time it is.
5. WET THE WALL
Take a wet cloth (or a sponge, it doesn’t really matter) and run that puppy all over your wall to get it nice and clean, as any buildup of dust, grease, and grime that hasn’t been dealt with could diminish what should be your upcoming perfect paint job.
6. BRING OUT THE PAINTER’S TAPE
Apply lines of painter’s tape to anywhere on your wall where there is an edge that is not to be painted. This could be the floor, certain areas of the ceiling where there is molding, or any other part of the wall that you don’t want to be the same exact color. Take your time with this step, as tape that is applied in a rush will most likely create a real sloppy line to your paint.
7. APPLY A NICE COAT OF PRIMER
Applying a lighter coat of paint is especially important if your wall has never been painted, if you used a lot of spackling paste earlier, if the existing paint is particularly glossy, or if you’re painting over a very dark color.
Once you’ve applied your primer, let it dry before you start the real paint job. This means for at least an hour (for latex-based paints) and at least eight hours (for all other kinds of paints).
8. LET THE “REAL” PAINTING COMMENCE
Use an angled brush to paint a 2” line in each corner, then use a roller (which you will dip and roll into the paint until it is evenly coated) to apply your paint all over your wall in W and M-shaped motions. When you’re all done, dispose of your paint and let your beautiful, freshly painted wall evenly dry.
 “I’m about to anchor your butt to the wall like my best friend Rick Dalton’s backless bookcase, Bruce Lee! Get some!”
ANCHOR A BACKLESS BOOKCASE TO THE WALL
Since you’re now a hotshot when it comes to painting a wall, it only makes sense that you also become a Gallantry Handyman legend when it comes to the domain of anchoring a sharp backless (we prefer a backless bookcase because it’s easier to both anchor and maintain) bookcase (you’re going to need somewhere to store those future hardcover Gallantry books of yours, HEYO!) to a wall. After all, the last thing you want to happen is for your bookcase to fall over onto friends or family because you forgot this critical (yet remarkably simple) DIY task.
Are you ready to get into these steps for anchoring a backless bookcase to the wall? We knew you would be, you sly Gallantry Handyman, you…
1. LOCATE THE STUDS
Finding the studs in the wall where you intend to anchor your bookcase is crucial. Learn how to efficiently find these bad boys HERE.
2. GET TO MEASURING
With the awesome Copper Cu-Tape Special Edition Copper Tape Measure from TEC Accessories, measure and space 2 L-brackets at least 24” apart, making sure that one of the L-brackets is on the stud.
THE COPPER CU-TAPE SPECIAL EDITION COPPER TAPE MEASURE FROM TEC ACCESSORIES
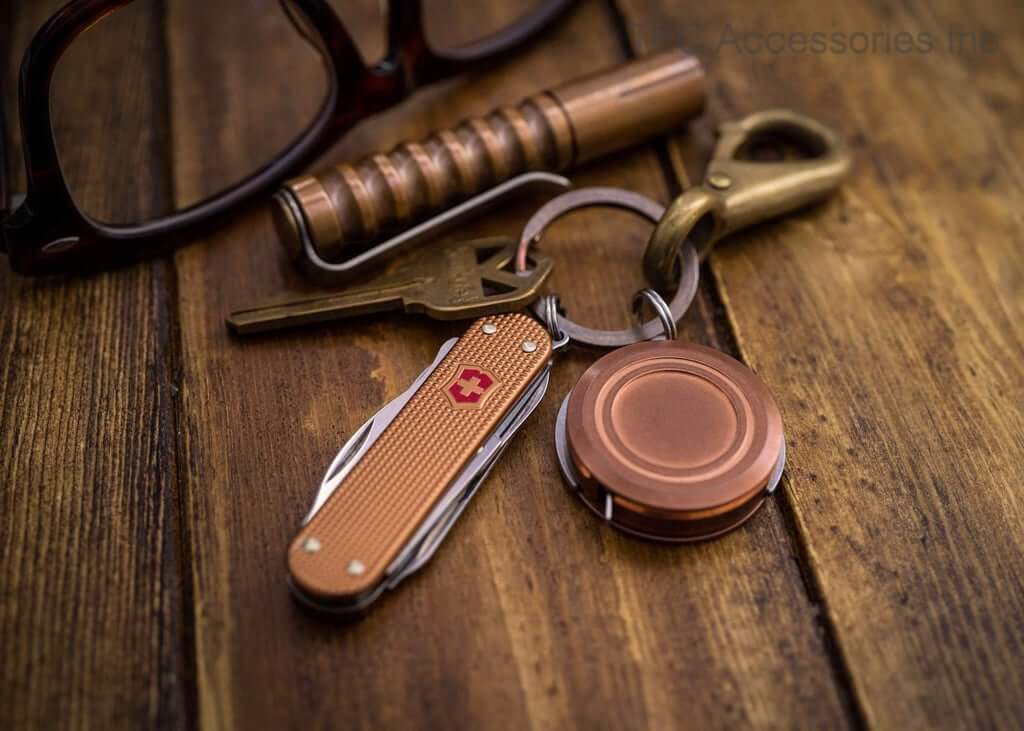
Based on the same design as the Ti-Tape micro-sized titanium tape measure, this Special Edition Cu-Tape is identical in every way except for the fact that it is made from gorgeous tellurium copper. The Cu-Tape is simply the smallest copper tape measure in the world. Slightly larger than a US Quarter, it is the perfect tape measure for everyday carry. Tiny, ultra-durable, and extremely lightweight, it also includes a removable keychain clip so that you can attach it anywhere to keep it on your person at all times. With this user-replaceable 3' measuring tape, you’ll never have to buy another portable tape measure again. Ever.
SPECIFICATIONS
- Manufactured from corrosion resistant tellurium copper
- 3 foot measuring length
- High contrast black on white markings, both imperial and metric units
- Removable stainless steel keychain attachment clip
- Replaceable measuring tape
- Ultra compact size
- Made in USA
Available in Copper
Cu-Tape SPECIAL EDITION Copper Tape Measure

$46.95
[tab-section data-sc-active-background="#ffffff" data-sc-other-background="#ffffff" data-sc-color="#555555"][tab title="Details"] Based on the same design as the Ti-Tape micro-sized titanium tape measure, this Special Edition Cu-Tape is identical in every way except it is made from tellurium copper. The Cu-Tape is simply the smallest copper tape measure in… read more
3. MARK EVERYTHING UP
With a pencil, mark the drill holes on both your wall and on your backless bookcase (i.e. the shelf).
4. HAMMER (OR DRILL) TIME
Use a hammer or a drill to make a pilot hole in all of your marked spots.
5. SCREW IT
Screw the L-bracket to the underside or side of the shelf and to the wall.
Now step back and admire the fine job you’ve done! GET SOME!
 “Hold on, Cliff. You’re telling me I have to know how to tighten my toilet seat, too? You weren’t kidding when you said if being a Gallantry Handyman was easy, every man in his right mind would be one. You weren’t kidding at all.”
TIGHTEN A LOOSE TOILET SEAT
Let’s be honest. There’s nothing (okay, fine, yes, there are a lot of things that are, but we digress) worse than plopping down on the john to handle your business only to feel like you’ve suddenly been transported to some frickin’ terrible, wobbling amusement park ride. Should such a horrid occurrence arise in your daily life, this is how you’re going to want to proceed…
1. GET YOUR TOOLS (ESPECIALLY YOUR SCREWDRIVER) READY
Though you may need pliers, a racket wrench with a deep socket, and a special tool that comes with your average toilet seat tightening kit, the most important tool that you’ll need when tightening a loose toilet seat is a good screwdriver. As such, we’re going to shoot you straight here, when duty calls (figuratively, and, er, literally), you can’t go wrong with the Bit Bar Titanium EDC Screwdriver from Big Idea Design…
THE BIT BAR TITANIUM EDC SCREWDRIVER
FROM BIG IDEA DESIGN
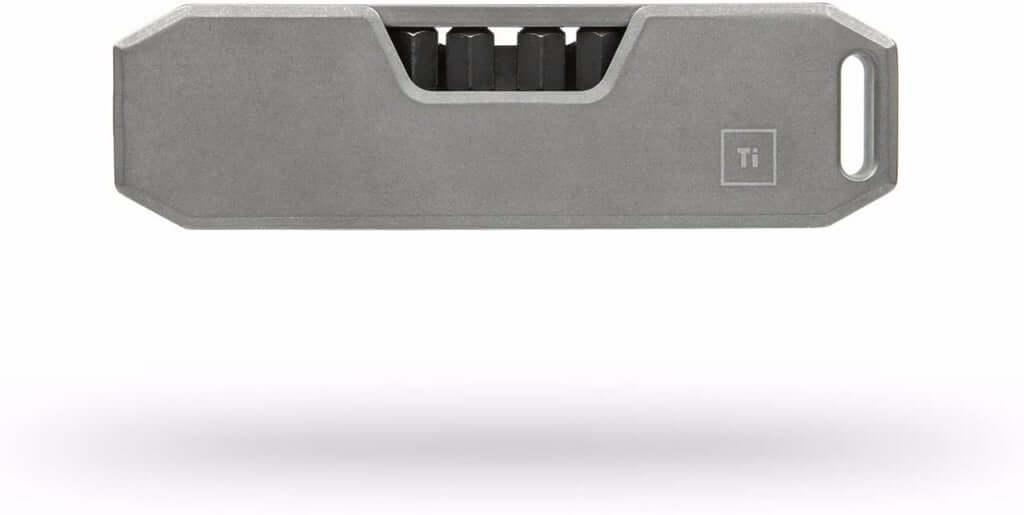
Screwdrivers are remarkably useful tools, but even the multi-bit ones aren't particularly carry-friendly. Luckily, the guys at Big Idea Design have created what might be the ultimate EDC multi-bit driver in their Bit Bar. This grade 5 titanium gadget offers up a full-sized driver grip in a pocket-friendly format. It also has in-handle magnetic storage for up to eight standard 1/4" hex bits, comes with a 60mm extension, has a pocket clip for easier carry, and is completely TSA-compliant. It even comes with a leather case, so you can stash it away safely when you're not carrying it. Pretty cool, right?
SPECIFICATIONS
- Grade 5 titanium construction
- 8 included black oxide driver bits
- Pocket clip
- Full-sized driver grip
- In-handle magnetic bit storage
- 60mm extension included
- Leather carry case
- TSA compliant
- Fits all standard 1/4" hex bits
Available in Stonewashed Titanium
Bit Bar Titanium EDC Screwdriver

$120.00
[tab-section data-sc-active-background="#ffffff" data-sc-other-background="#ffffff" data-sc-color="#555555"][tab title="Details"] Screwdrivers are remarkably useful tools, but even the multi-bit ones aren't particularly carry-friendly. Luckily, the guys at Big Idea Design have created what might be the ultimate EDC multi-bit driver in their Bit Bar. This grade… read more
2. LOCATE THE BOLTS
Though occasional toilet seat bolts are exposed, the truth is that most of them just have a plastic flap that snaps shut to completely cover them. Use your Bit Bar Titanium EDC Screwdriver from Big Idea Design to pry the plastic flap open, as doing so will expose those bolts that are supposed to secure the seat to the top of your toilet bowl.
3. TIGHTEN THOSE BOLTS
If your bolts have slotted heads, use your screwdriver to turn them clockwise (evenly on each side) until they are very tight. When you have finished tightening, your toilet seat should be sitting level.
If for some reason your bolts spin without tightening, use pliers to grip the nut that is threaded onto the mounting bolt from below the toilet while simultaneously tightening the bolt from above the toilet with a screwdriver. While most toilet seats use steel screws, the occasional cheaper seat has plastic bolts. If this is the case for you, be extra careful so that you don’t strip the threads or break the plastic bolts.
If you have to tighten the mounting nut from underneath your toilet, turn the toilet seat nuts clockwise until they are tight. You can tighten these bolts with a racket wrench that has a deep socket, though an adjustable wrench should also do the trick.
 “Hey, fella. You need help changing that doorknob of yours or what?”
CHANGE A DOORKNOB
Having a faulty doorknob sucks. Thankfully, changing one out doesn’t. Should you need to change a doorknob, follow these steps…
1. GET TO UNSCREWING
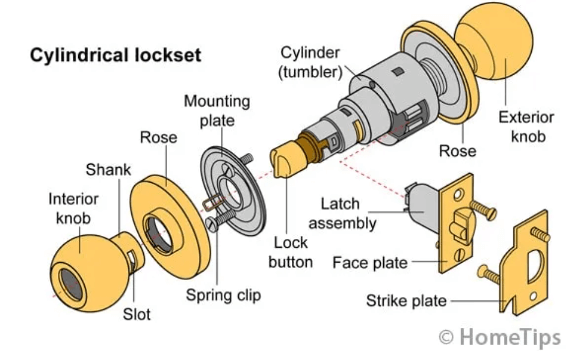
Source: Hometips.com
With one of the screwdrivers from your Bronze Bear Grylls Ultimate Multitool from Gerber (you can get yours below), unscrew the 2 screws in the handle’s face plate, rose (also known as a “knob plate”, this is the piece that fixes the knob to the door), and strike plate.
THE BRONZE BEAR GRYLLS ULTIMATE MULTITOOL FROM GERBER

No one knows survival better than Bear Grylls. That’s why this multi-tool has everything you need to get yourself out of a jam. Manufactured by renowned tool brand Gerber, the Bear Grylls Ultimate Multi-Tool has 12 stainless steel, rugged components, including knife edges (straight and serrated), pliers, screwdrivers (flat and Phillips), bottle/can openers, scissors, wire cutters and more!
With an ergonomic, comfortable rubber grip, you can be sure you'll enjoy using this fresh everyday carry multi-tool for whatever life throws at you.
SPECIFICATIONS
- Includes 12 Stainless Steel Components, including:
- Needle Nose Pliers
- Straight Knife
- Serrated Knife
- Saw
- Flat screwdriver (small and medium)
- Phillips head screwdriver
- Bottle Opener
- Can Opener
- Scissors
- Wire Cutters
- Ergonomic Textured Rubber Grip. for comfort and reduced slippage
- Closed length: 4"
- Weight: 8.5 oz.
2. PULL, SLIDE, AND REMOVE
In other words, pull the handle off both sides of the door, slide out the face plate/pawl, and remove the strike plate.
If the new knob that you’re installing happens to be a different size than the faulty one you’re replacing, you can use a hammer and chisel to adjust the openings in the door and the door jamb accordingly.
3. INSTALL YOUR NEW KNOB – PART A
Push your new pawl mechanism and face place into the side of your door (while carefully making sure that the latch faces the same direction that the door will close, thus ensuring that it connects correctly with the strike plate) before screwing the face plate securely into place.
4. INSTALL YOUR NEW KNOB – PART B
Proceed to insert the handles into the door (this way the pawl’s square peg fits into its slot in each knob, while the screw holes align with the threaded cylinders on each side and any levers/locks face the proper direction) before screwing each knob plate into firm place.
5. SCREW ON THE STRIKE PLATE
Screw on the strike plate and your new knob should be ready to go!
 “Tell that Rick Dalton that he better learn how to change a light switch, too! Us Gallantry Handymen don’t play!”
SWITCH OUT A LIGHT SWITCH
Switching out a light switch is a simple task that you’ll inevitably come face to face with one day (that is, if you haven’t already). Should this issue arise, you really don’t need a professional. Here’s how you’ll want to replace your old light switch with a brand new one…
1. FIGHT THE POWER
Locate the correct circuit breaker and flip it in order to turn off the power. Test that you’ve flipped the right one once or twice, then further ensure that the power is off by removing the switch from the wall and placing a circuit tester up to the wires.
2. BRING OUT THE SCREWDRIVERS
In addition to a replacement light switch (obviously), you will also need a Phillips head screwdriver, and, of course, a flathead screwdriver. Our extremely sleek 10-in-1 Titanium Pocket Tool Slide from Big Idea Design comes with 2 of them!
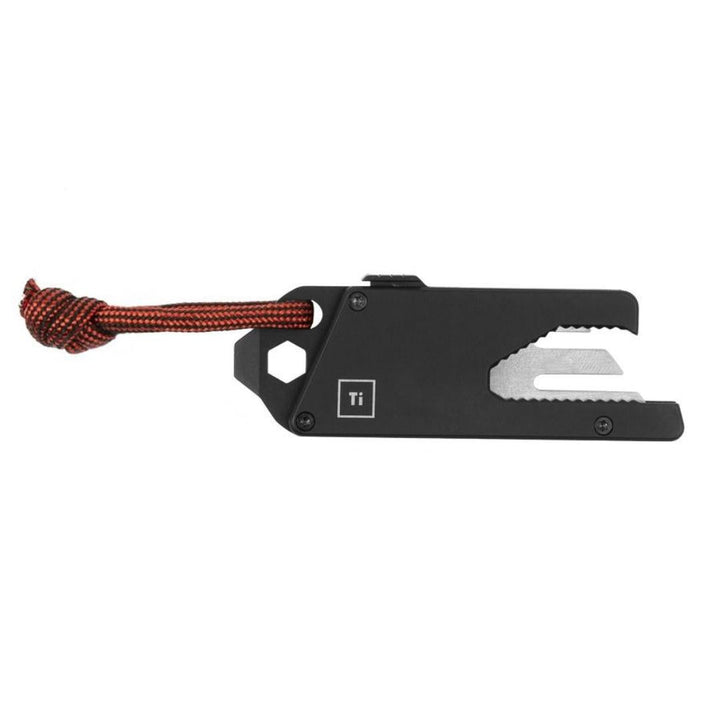
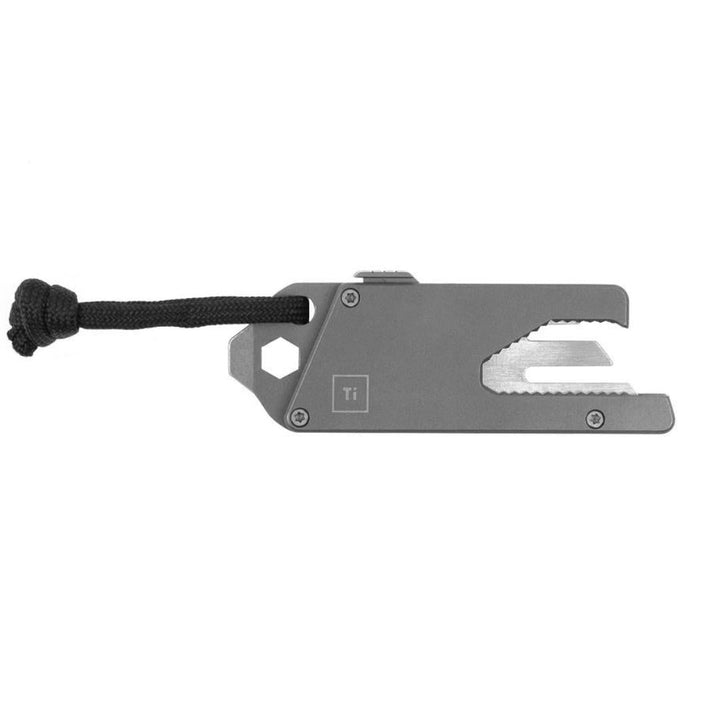
THE 10-IN-1 TITANIUM POCKET TOOL SLIDE FROM BIG IDEA DESIGN
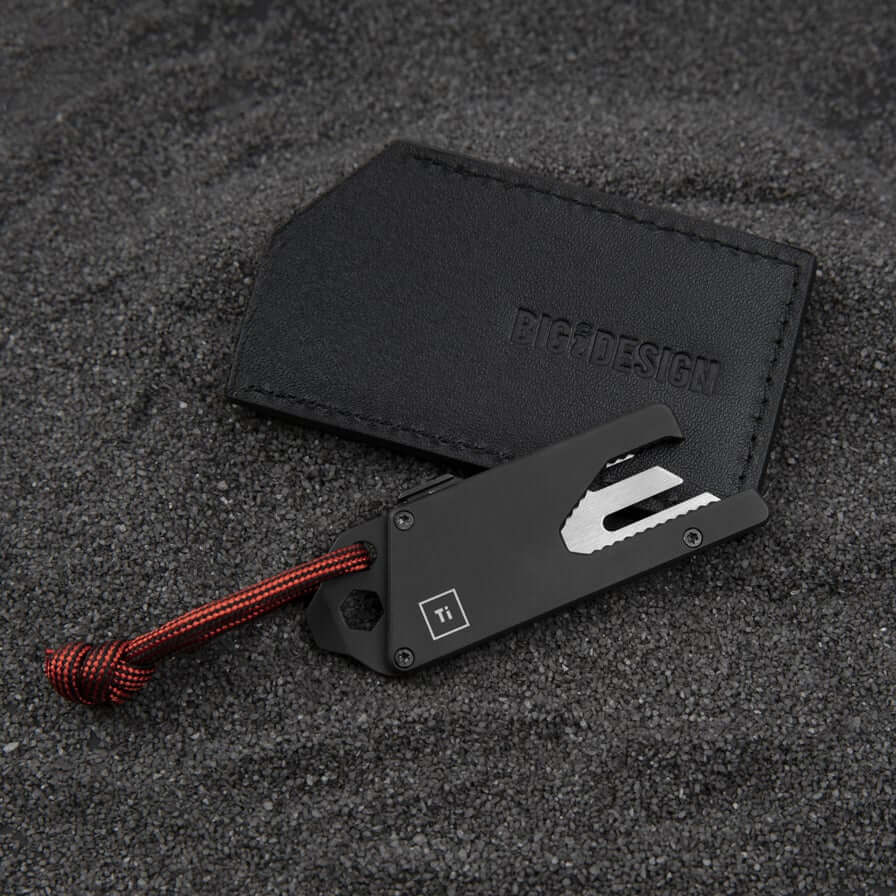
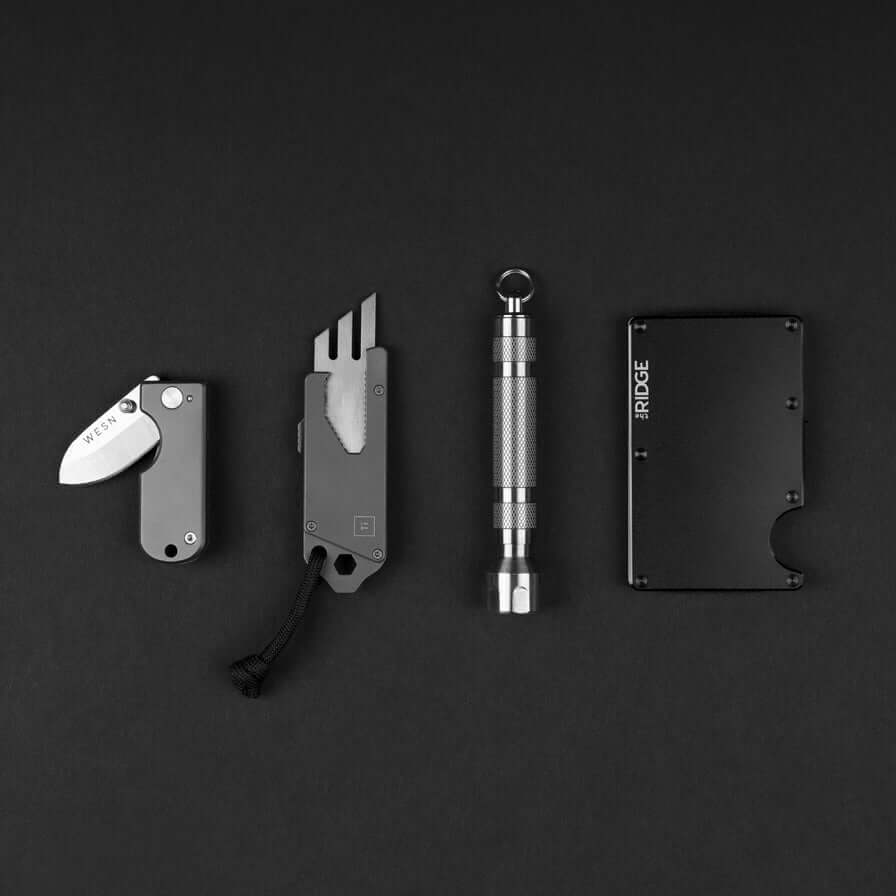
Big Idea Design's Titanium Pocket Tool (TPT for short) was already one of the most compact, versatile, and hard-wearing multi-tools on the market, though the ten-in-one tool has been taken to the next level with the new and improved TPT Slide. Comprised of Aerospace Grade 5 6AL4V titanium frame, the Slide version is machined from plates that are 25% thicker than the outgoing model’s. A new, one-handed, ambidextrous, secure sliding mechanism with dual lockout points has also been introduced for added convenience. The universal wrench — which offers 15 different socket sizes – has been made stronger as well, and the TPT Slide has been given a new removable pocket clip that is attached to the tool without any screws. This upgraded version of this popular titanium pocket tool still boasts two flathead screwdrivers, a bottle opener, internal magnet, 1/4” hex bit opening, measurement cues, mini pry bar/scraper, natural or black-anodized stainless steel blade, camping fork, and lanyard hole (along with 550 paracord), and still comes encased in a leather sheath. Weighing in at just 1oz and measuring just 3” long, the TPT Slide is proof that good things still come in small packages.
SPECIFICATIONS
- Aerospace Grade 5 6AL4V titanium frame
- Matte black finish
- Now machined from 25% thicker titanium plates than the TPT
- 420 stainless steel insert
- New, one-handed, ambidextrous, secure sliding mechanism with dual lockout points
- New, unique removable pocket clip, adjoined without using screws
- 550 paracord lanyard and leather sheath included
- 10+ built-in tools including: bottle opener, 2 flathead screwdrivers, internal magnet, 1/4" hex bit opening, measurement cues, mini pry bar, scraper, and 15 socket sizes.
- Improved, stronger universal Wrench Design (15 Socket Sizes)
- SAE 15/64, 1/4, 17/64, 9/32, 5/16, 11/32, 3/8, 7/16 in.
- Metric 6, 7, 8, 9, 10, 11, 12 mm
- TSA Compliant
- 3" L x 1" H x 0.38" D w/ clip (0.20" D w/o clip)
- 1oz weight
10-in-1 Titanium Pocket Tool Slide
$80.00
[tab-section data-sc-active-background="#ffffff" data-sc-other-background="#ffffff" data-sc-color="#555555"][tab title="Details"] Big Idea Design's Titanium Pocket Tool (TPT for short) was already one of the most compact, versatile, and hard-wearing multi-tools on the market, though the ten-in-one tool has been taken to the next level with… read more
10-in-1 Titanium Pocket Tool Slide
$80.00
[tab-section data-sc-active-background="#ffffff" data-sc-other-background="#ffffff" data-sc-color="#555555"][tab title="Details"]Big Idea Design's Titanium Pocket Tool (TPT for short) was already one of the most compact, versatile, and hard-wearing multi-tools on the market, though the ten-in-one tool has been taken to the next level with the… read more
3. BEGIN REMOVING & UNSCREWING
Remove the switch plate cover, unscrew the switch’s mounting screws from its electrical box, and pull the switch completely out of the wall (with the wires still all attached).
4. CONTINUE TO UNSCREW…THEN CUT
Unscrew the few wires attached to the switch, then cut the wire connection to fully remove the wires from the terminals.
5. BRING OUT THE WIRE STRIPPERS & NEEDLE-NOSE PLIERS
Use wire strippers to remove the insulation from each wire, then use needle-nose pliers in order to make a small loop at the end of each one.
6. PREPARE TO CONNECT YOUR NEW SWITCH
Make sure that it is in the correct position (i.e. turned down with the word “off” showing).
7. CONNECT THE WIRES
With your new switch facing right side up, finally connect those wires (in the same positions they were connected in the previous switch), hooking the loops over the new switches and tightening them before using electrical tape around the light switch and wires as a way to provide additional insulation.
Whether or not you want to play Kanye West’s “Through the Wire” during this step, hey, that’s completely up to you.
7. SCREW YOUR NEW SWITCH INTO THE WALL
8. TEST TIME
Test that your new switch is working by restoring power at the circuit breaker.
8. ATTACH THE COVER PLATE
If the light turns on after you’ve restored power at the circuit breaker, go ahead and attach that cover plate of yours because your light switch has been fully replaced!
NICE WORK!
 “The everyday carry featured in this week’s Dispatch? Just incredible. As a matter of fact, I want my next picture to be about Gallantry EDC! I’ll play the lead, a Gallantry Handyman for the ages. Can you dig it?”
WE SEE YOU, GALLANTRY HANDYMAN
When you have the everyday carry items that we’ve highlighted here nearby, you really will be prepared to knock out any common fixer upper that comes your way (for those tasks that we didn’t cover this week, just do some light, well-conducted internet research and you’ll be good to go) like a champ. If that’s not the Gallantry Handyman way, hey, we don’t even know what is.
Move over, Tim Allen. We got some new Home Improvement Sheriffs in this town.
 “Will you please watch Once Upon a Time in Hollywood with me, Gallantry Handyman with the coolest EDC multitools that I’ve ever seen?”
STREAMING THAT GALLANTRY HANDYMAN EDC
We’d be remiss if we didn’t feature Quentin Tarantino’s 2019 love letter to the final days of Hollywood’s golden age, Once Upon a Time in Hollywood, starring Leonardo DiCaprio, Brad Pitt (who steals the movie as a roguish Gallantry Handyman who knows his way around some EDC), Margot Robbie, and Al Pacino, as our “streaming” (we’re using quotation marks here because unfortunately the flick isn’t streaming on any of the usual platforms at the moment) selection of the week. As such, we highly recommend that you rent (or buy) it on Amazon Prime HERE!
 “Mm, yummy. I love myself a good ol’ fashioned Gallantry Handyman who knows his way around fresh Gallantry EDC.”